Initial Storyly Flow (Beta)
Warning
That documentation for
Storyly SDK 3.0and over. If you are usingStoryly Web SDK 2.x.xand lower, you should follow through with that documentation.
Introduction
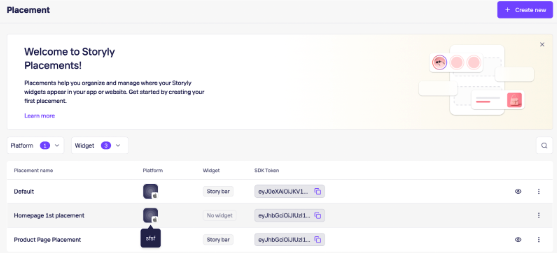
Placement
A Placement is a location in your app (homepage, PDP, category page etc.) where a widget or flow will appear. Instead of integrating each widget separately, you simply integrate the placement you want to use, making it easier to manage and activate widgets and flows.
Widgets
A Widget is a modular, visual content block like a Story, Banner, Swipe Card, Vertical Feed, or Canvas. Widgets are goal-oriented, fully customisable, and can be placed and updated through the dashboard
Flows
A flow is a pre-configured flow of one or more widgets designed to serve a specific business goal such as product discovery, conversion, retention, or loyalty. Each flow comes with built-in content logic and optional AI features to personalize the experience per user. Once set up, Storyly automatically manages what to show, when to show it, and to whom—maximizing impact without additional manual effort.
Storyly Flow Placement Web Initialization
This walkthrough shows how you can add Storyly placements to your web applications.
Before you begin
Please login to Storyly dashboard and get your placement token. You can get it from Storyly Dashboard ->
To show widgets and flows inside your placement, you have to specify a container in your application as below:
<body>
    <div id="storylyPlacementContainer">
      <storyly-placement id="storylyPlacement"></storyly-placement>
    </div>
The widgets in the placement will be showcased in this container, you can arrange the placement and its limitations according to your use case
Installation
To initialize the Storyly placements, you have to import the placement JS library to work with
This automatically registers the custom element that you can use inside your application
<script
   src="https://storyly-web.s3.eu-west-1.amazonaws.com/storyly-placement/storyly-placement.js"
      type="module"
    ></script>
Info
The latest version of Storyly V2 is available after 4.17.0. You can follow the latest version updates from here.
Using npm/yarn (coming soon)
At the moment, storyly-placement is distributed via script import. NPM distribution is planned but not available yet.,
If your project requires bundling(React, Vue, Angular), you can still wrap as a web component.
Initialization
<script>
  (async () => {
    await customElements.whenDefined("storyly-placement");

    const storylyPlacement = document.getElementById("storylyPlacement");
    const config = {
      token: "<YOUR_TOKEN>",
    };

    storylyPlacement.on("onPlacementReady", (data) => {
      storylyPlacementContainer.style.width = "100%";
      storylyPlacementContainer.style.height = "500px";
      console.log("onPlacementReady", data);
    });

    storylyPlacement.init(config);
  })();
</script>
Warning (new Integration milestone)
While initializing the Storyly Placement the container ratio must be adjusted as above recipe offers. This is a really crucial step in the integration since without specifying a ratio, the placement will not be initialized.
Using multiple Placements(Best practices+common usage - planned for phase 2 of this doc.)
To include more than one placement in your application, give each placement a unique ID and initialize them in the containers.
The goal here should be to render more than one placements on the same page, each acting independently.
<script>
  const p1 = document.getElementById('PLACEMENT_TOKEN_1');
  const p2 = document.getElementById('PLACEMENT');

  p1.init(;
</script>
Storyly Placement provides event listeners that let you track user actions and customized logics. It also shows if you have the right events firing up for troubleshooting later on.
Loaded Event
This event will let you know that Storyly Placement has completed its network operations, and the content of the widget embedded inside the placement is seen by the user. In order to be notified about this event, use the following example:
storylyPlacement.on(“loaded”, (data)=>
console.log(“Placement loaded”, data));
By using the userEvents you can enable all the events that are necessary and will be launched upon implementing the feature related, below are the events that are invoked under userEvent.
userEvents
Loaded: Fired when the content inside the placement is loaded finished the network operations, and shown to the end user
loadFailed:Fired when the content inside the placement is not yet loaded and awaiting other operations or being blocked by a logic. With this event you can track and test you cases.
openStoryGroup: Fired when a story group(tray item) has been opened either by user tap/click or programmatically(app logic)
storyOpenFailed: Fired when a story fails to be opened, malformed data or blocked data can be the case
storyImpression: Fired when a story is visible and an impression is recorded
storyCompleted:
groupCompleted:
closeStoryGroup:
onPlacementReady: Fired when the placement is ready to be shown in the container. Emitted with the {ratio} when active widget ratio is known
storylyPlacement.on("onPlacementReady", (data) =>
  console.log("Placement is ready", data)
);

storylyPlacement.on("userEvent", (data) =>
  console.log("User interaction", data)
);

storylyPlacement.on("actionClicked", (data) =>
  console.log("Action button clicked", data)
);

storylyPlacement.on("updateCart", (data) =>
  console.log("Cart updated", data)
);

storylyPlacement.on("swipeCardViewed", (data) =>
  console.log("Swipe card viewed", data)
);
Updated about 1 month ago