Monetization with Stories
There are 2 different monetization methods with Storyly: Premium and Programmatic.
Premium Ads (premium brand partnerships)
Storyly would enable you to have a premium channel for your brand partnership opportunities! For instance, through a pinned story group your brand partners may endorse their products, make quick surveys, or stream their most recent communication through Storyly.
In addition, you can invite your partners to the dashboard with the Teammates structure offered by Storyly and you can give your partners, whom you will define as “Editor”, the opportunity to review and analyze only the content relevant to them. Thus, it will be possible to use Storyly as a channel in your monetization strategies.
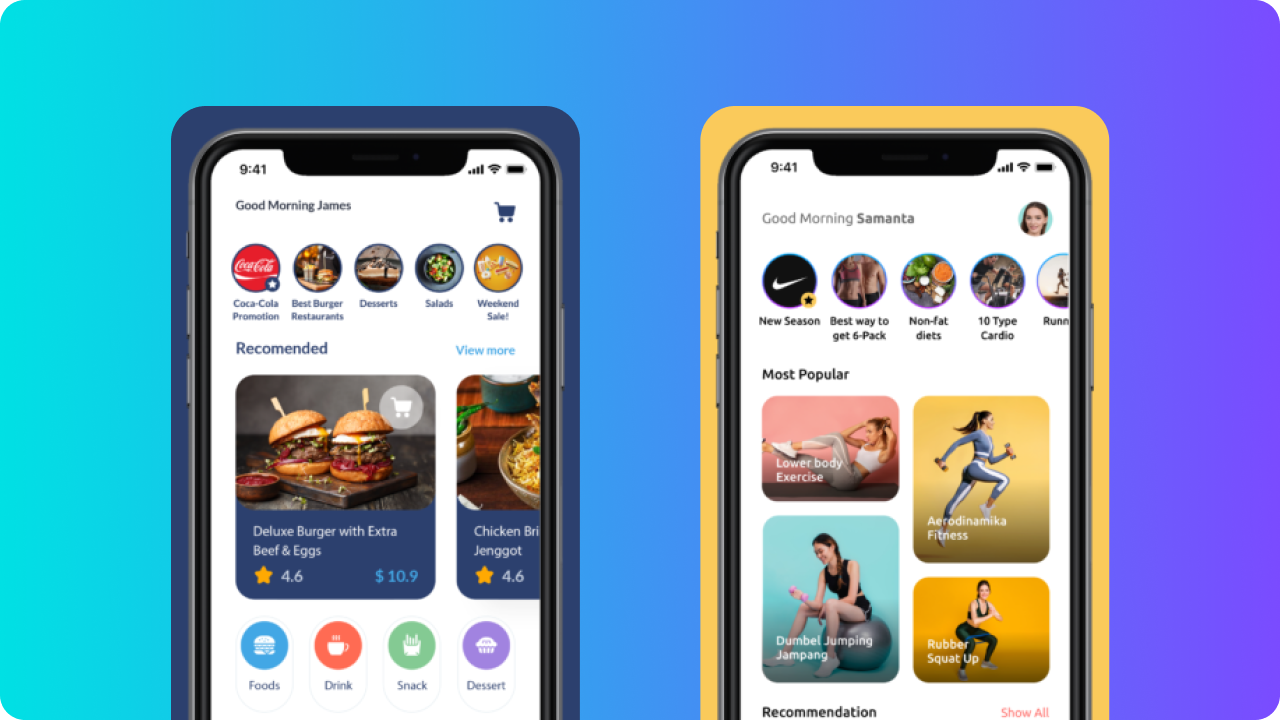
Programmatic Ads
Storyly is integrated with Google Ads SDK. So, you are able to show ads from Admob or Google Ad Manager. There is no commission. It will be an extra revenue channel for you.
Important!
You need to have a Google AdMob account to get going.
Here are is what you should complete on before going on Storyly side.
Native ads are ad assets that are presented to users via UI components that are native to the platform. They're shown using the same types of views with which you're already building your layouts, and can be formatted to match the visual design of the user experience in which they live. In coding terms, this means that when a native ad loads, your app receives a NativeAd object that contains its assets, and the app (rather than the Google Mobile Ads SDK) is then responsible for displaying them.
Broadly speaking, there are two parts to successfully implementing Native Ads: loading an ad via the SDK and displaying the ad content in your app.
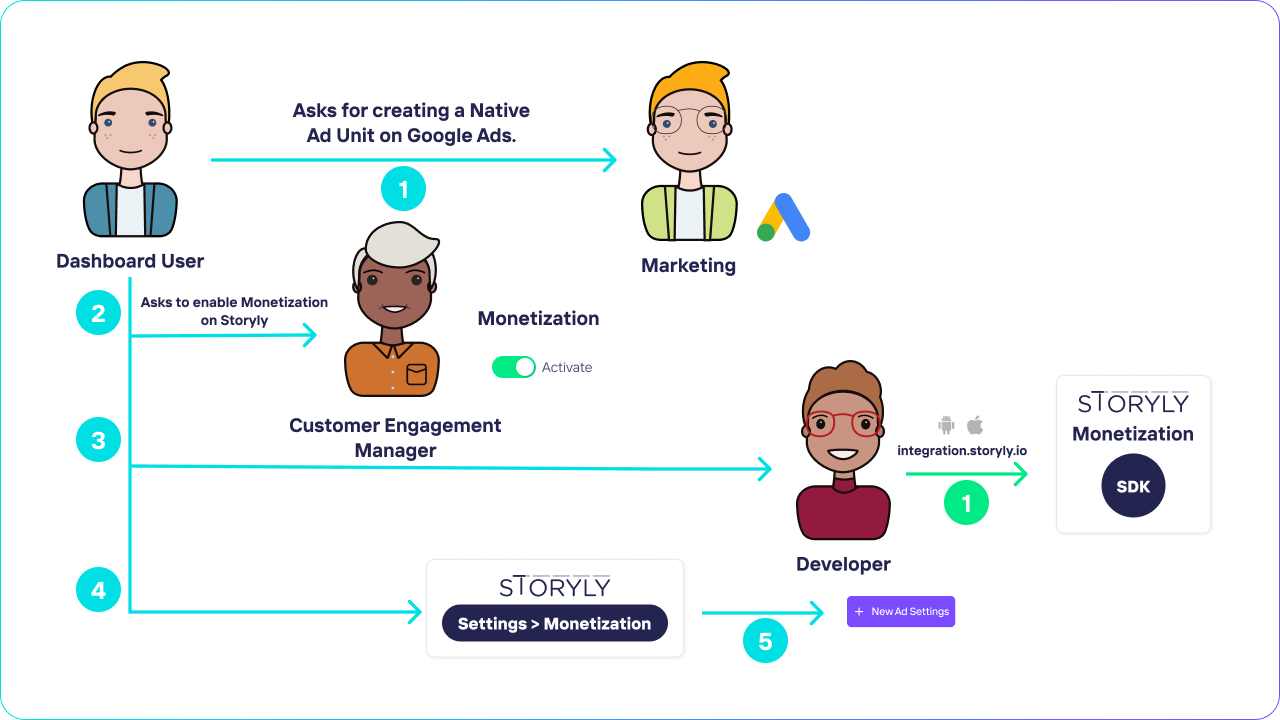
Let's get started. First, if you are willing to use this feature, you'll need to contact with your Customer Engagement Manager and ask for them to enable it on your dashboard.
If you've talked and get the Monetization section under settings, now you'll be needing Storyly Monetization SDK integrated with your app. Here are the required integration documents for the use of monetization SDK.
Important!
While you are showing up personalized ads to your users on stories using Storyly Monetization SDK, the recommendation consent is actually redirected to Google. Storyly doesn't hold or analyze the user data to show recommended ads to your users, Google handles that part. Here are the related documentation from both Google and Storyly side about Forwarding Consent.
-
Android - Storyly Monetization SDK
-
iOS - Storyly Monetization SDK
-
React-Native - Storyly Monetization SDK
-
Flutter - Storyly Monetization SDK
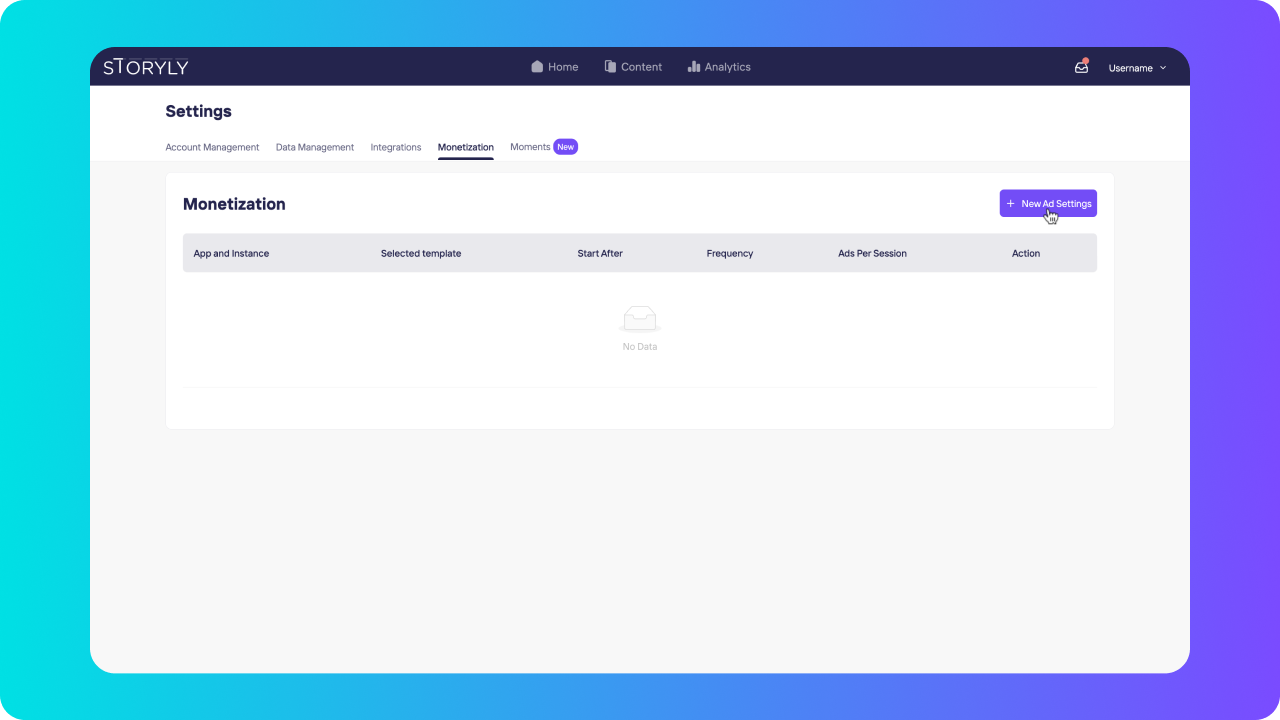
Under the Settings -> Monetization section, click on + New Ad Settings to get started.
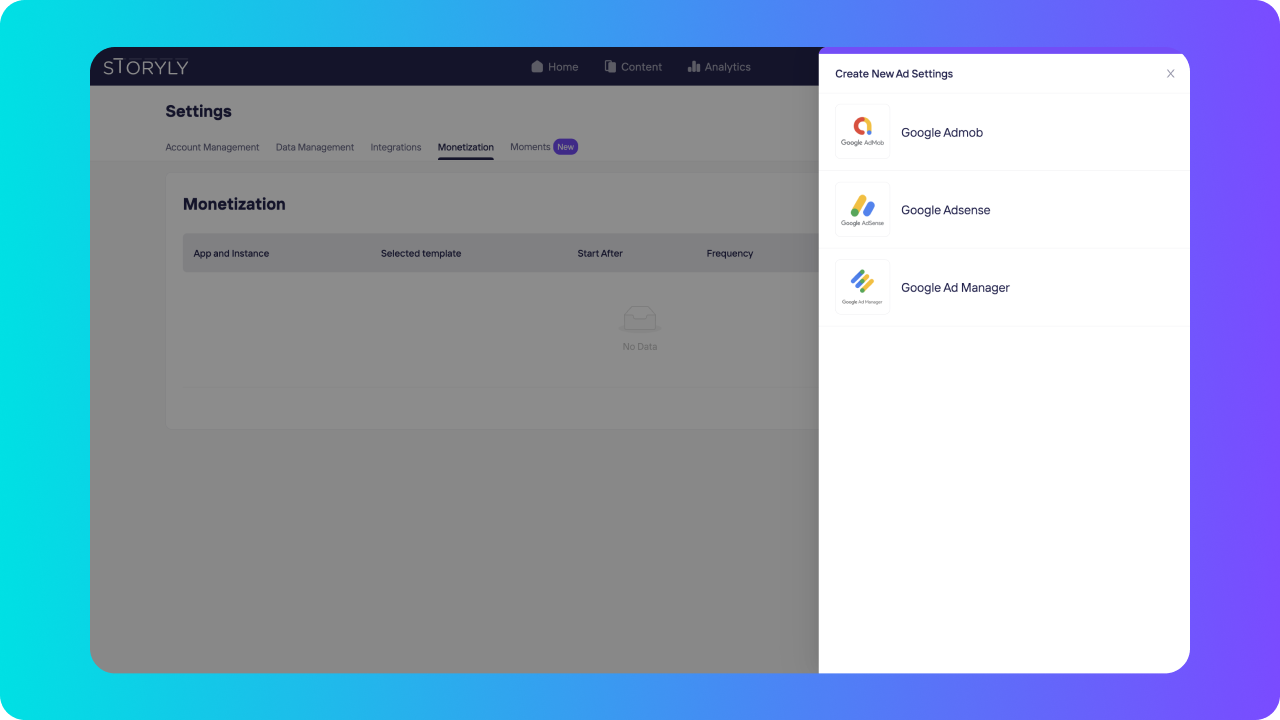
Then you'll have to set the required settings for your Ads. Select your app and instance to get started with.
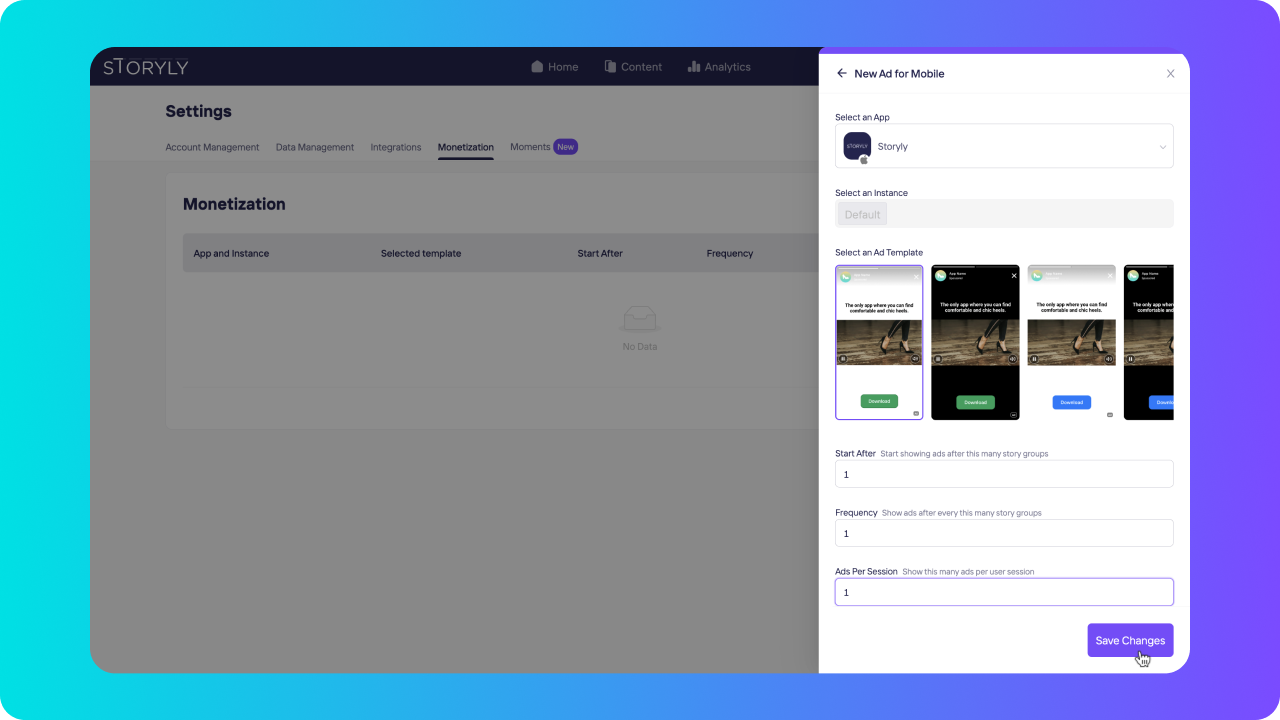
Next step is, selecting a template. This template will show how your ads will be seen as a story.
Now, the related ad settings.
- Start After is actually for you to decide when will the ads occur. For example, if you set it to "1", your first ad will show up after a user watches the first story group.
- Frequency is all self-explanatory, its about how frequently your ads will be shown to your users. Let's say, "2", this means after a user watches 2 story groups, there will be an ad.
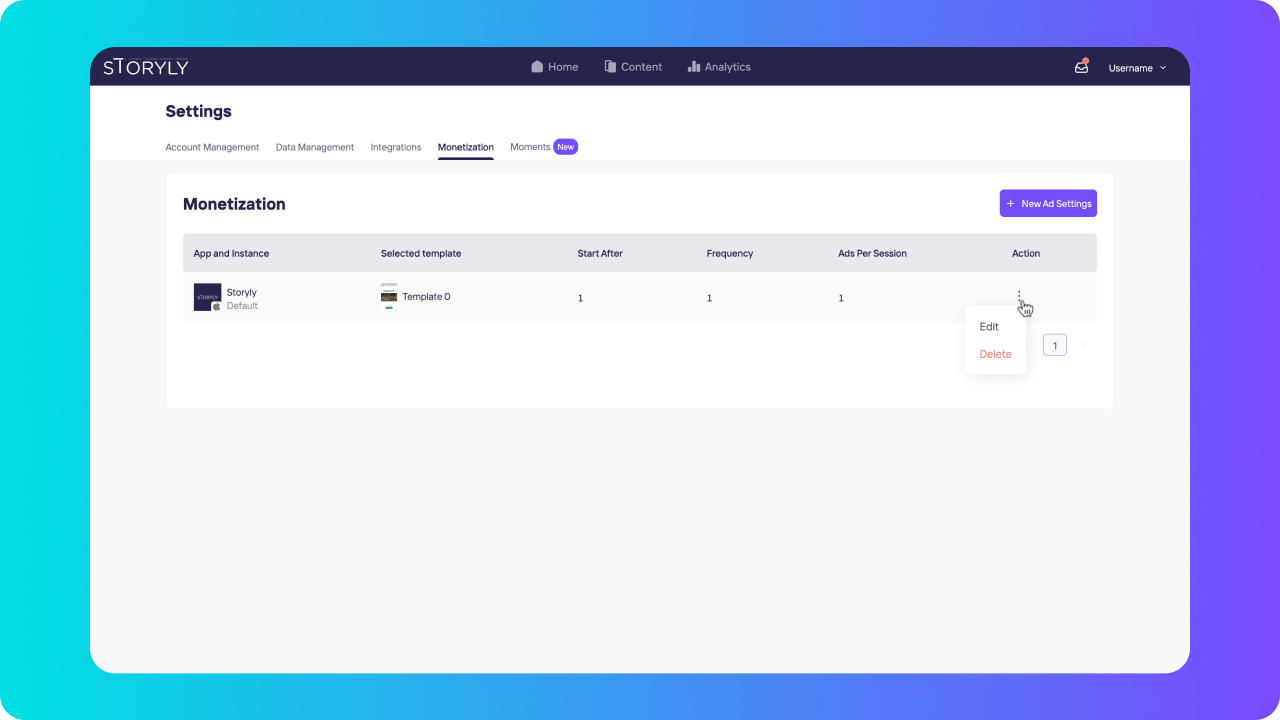
Once you are all done with the settings, your ad will be ready! You can edit the settings or delete it whenever you like.
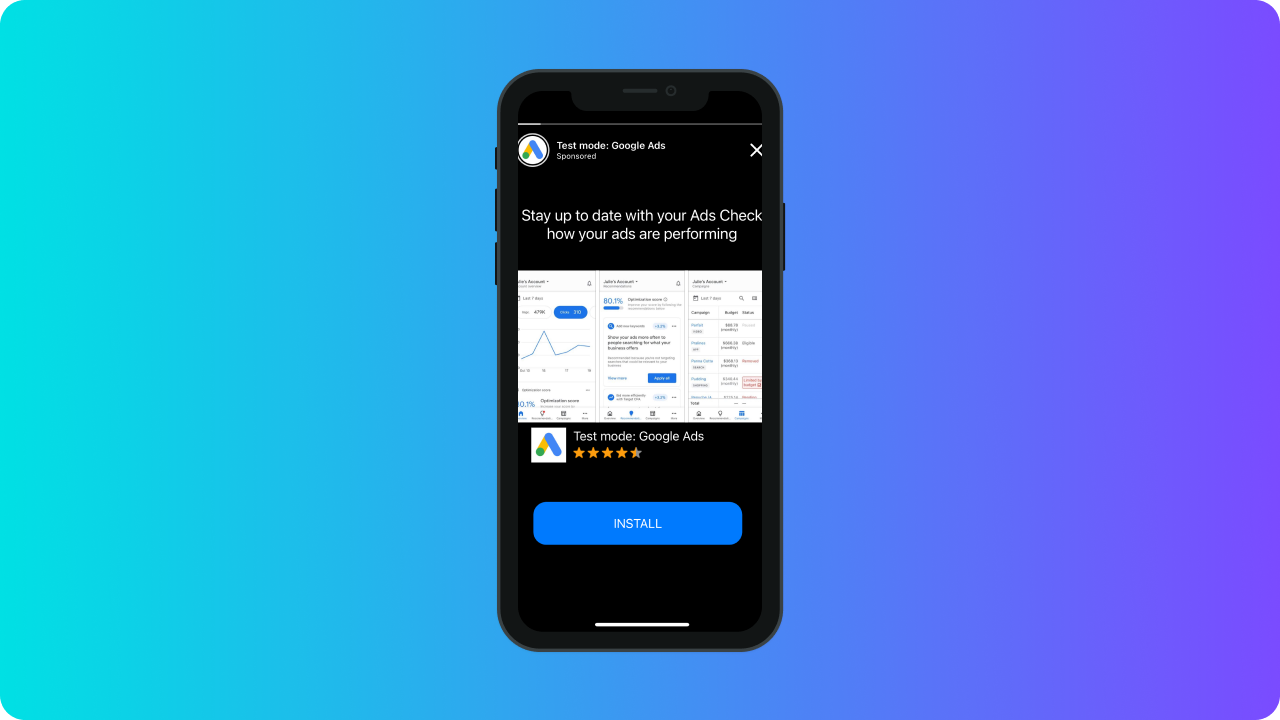
There it is, your programmatic ads setup is all done! Now you have a brand new channel for monetization and its with stories, which is a great familiar and non-harassing experience for your user.
User Guidance
Programmatic Monetization for Web Stories
Monetization for Web Stories with Adsense
Before starting to monetize your Storyly web stories, make sure that you have an active Adsense account for your website. If you already have an active Adsense account for your website, you may follow the steps below to start monetizing web stories.
- Log in to your Adsense account and select “By Ad Unit” option on the Ad tab in Menu,
- Click the “Display Ads” ad unit option,
- To track your web story ad statistics in your Adsense dashboard, you may differentiate by naming your new ad unit. We recommend you to use “Storyly Web Ads” as the ad unit name,
- Select “Responsive” option for ad size,
- Your web story ads will look like vertical preview ad examples,
- To save your ad unit, you may click the create button,
Alternatively you can create and track your ad unit in your Google Ad Manager account.
First, you have to create an ad unit to define your web story ad under Inventory section in the menu.
Important!
We recommend you to define a unique name to differentiate your web story ads. You may also use the same name for the code field.
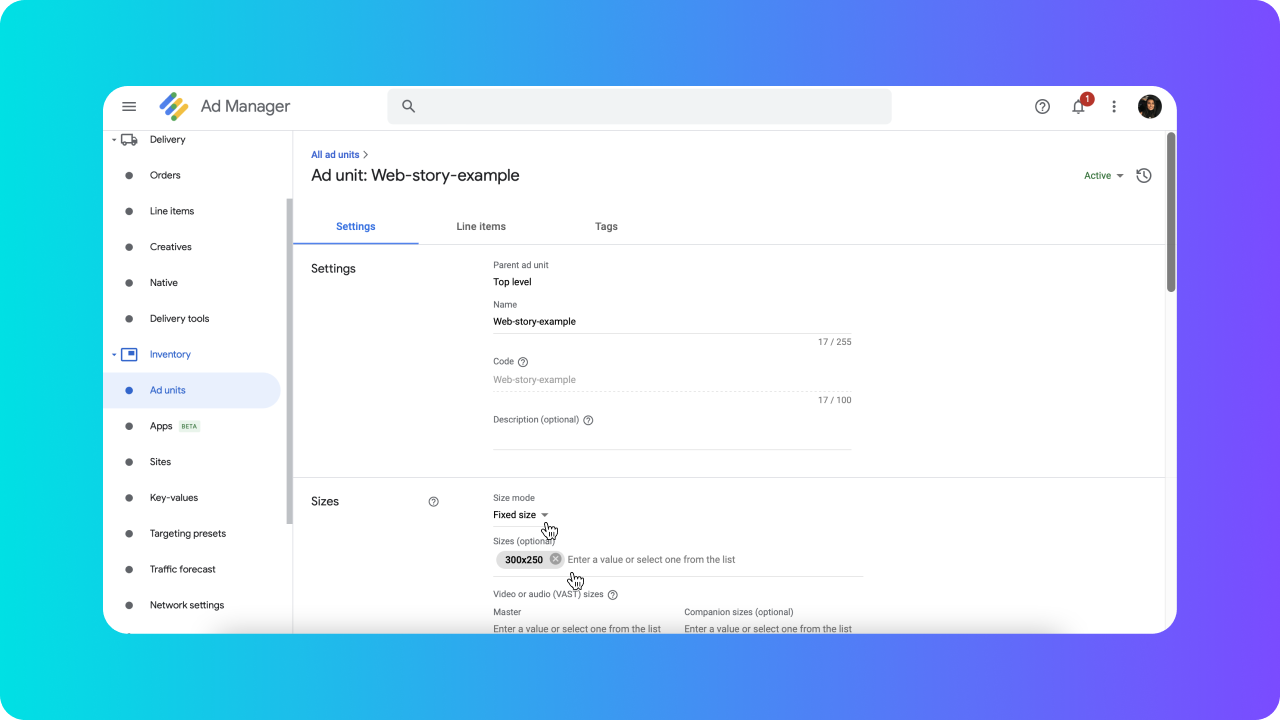
You should choose the size mode as “fixed size”. You should select “300x250” px for ad size.
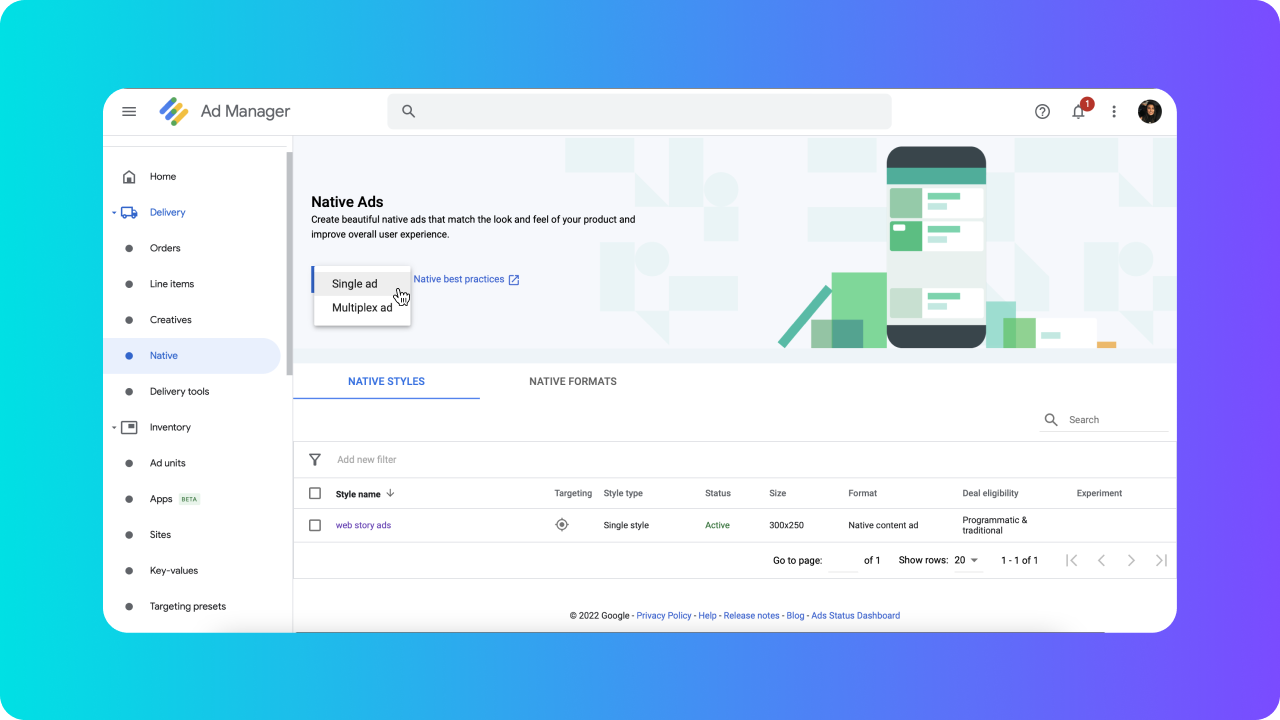
After completing ad unit creation, go to “Native” under Delivery section to create a native ad. You should click on New Native Ad button to create a new ad, and select Single ad option in the dropdown menu.
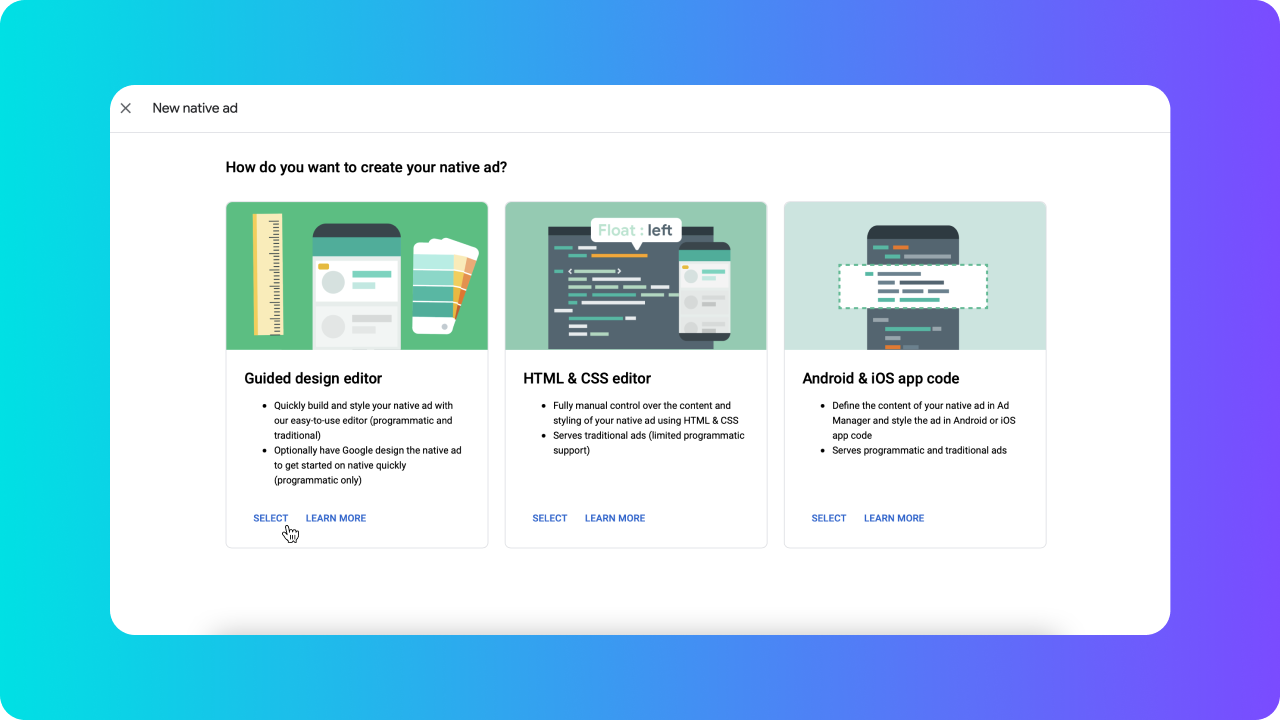
Give a native ad name for your web story ads and select Guided Design editor.
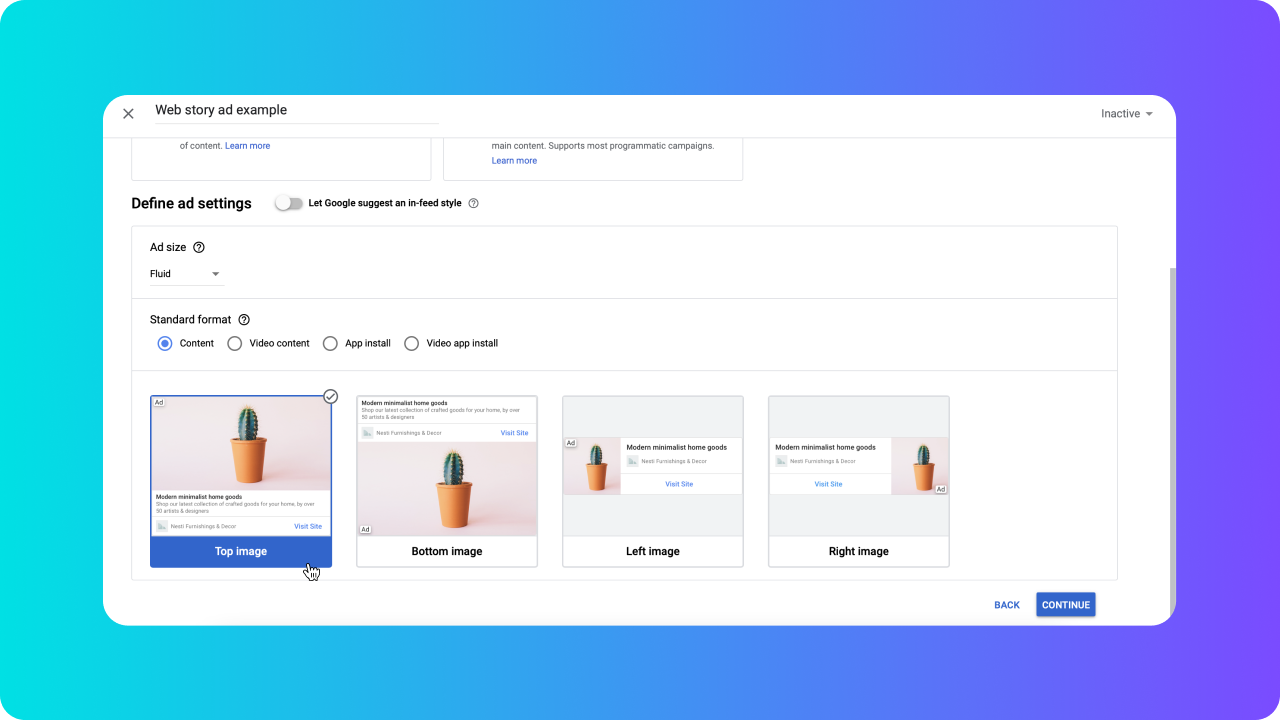
Here for the most efficient creative appearance, we recommend using Top image option.
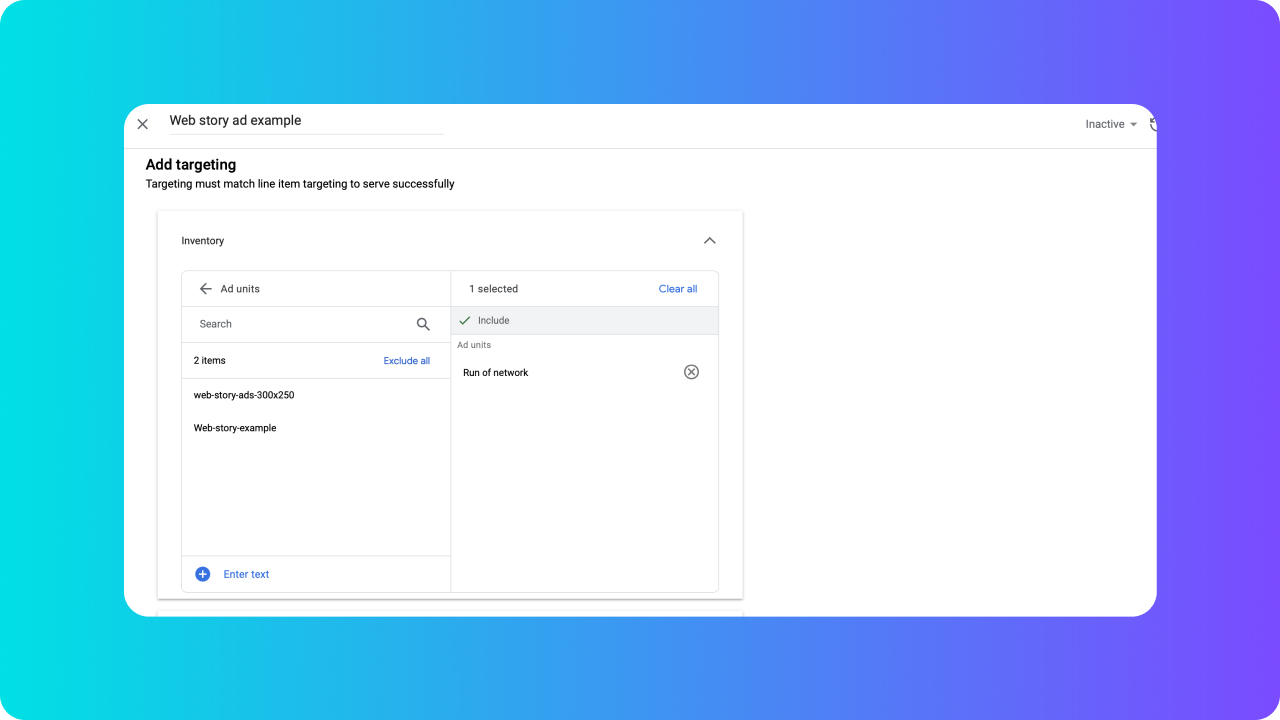
You should select the ad unit in the Inventory that you've created on the previous steps to publish your web story ads.
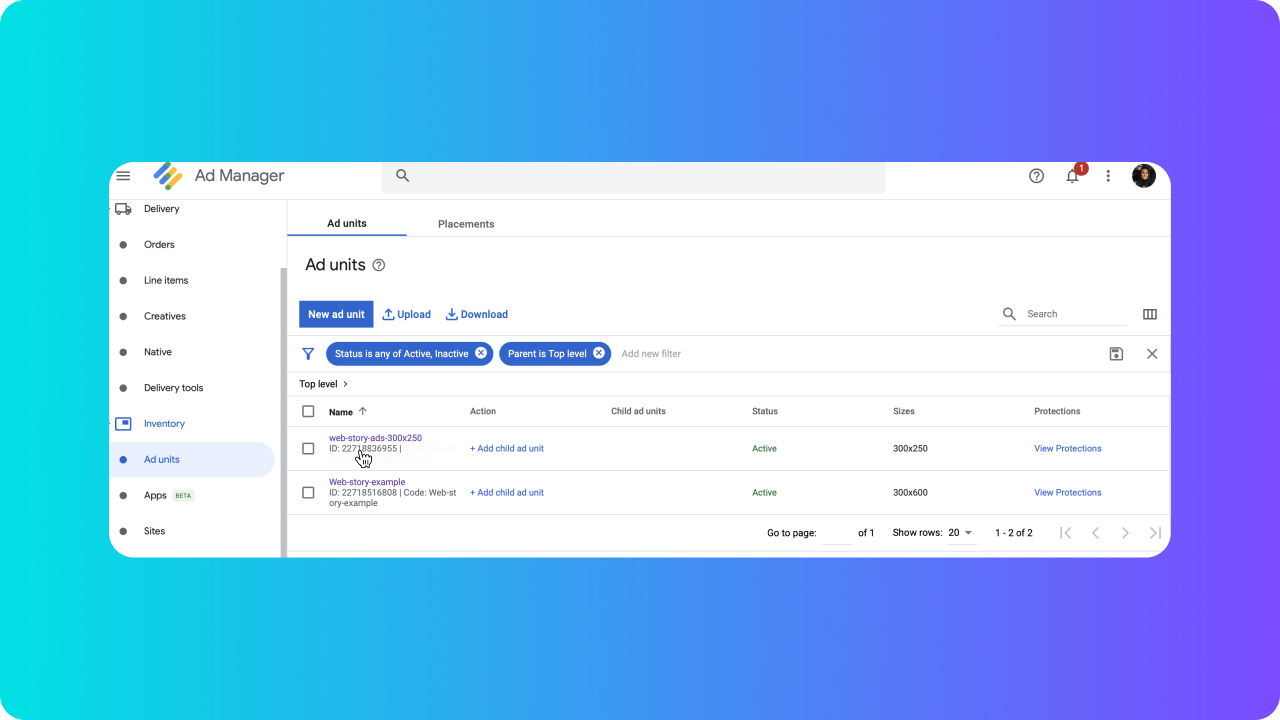
After completing all of the steps, you should use generated ad unit ID and Adsense Publisher ID (from your Adsense account) to fill relevant field in Storyly Dashboard, which will be explained below.
Let's get started. First, if you are willing to use this feature, you'll need to contact with your Customer Engagement Manager and ask for them to enable it on your dashboard.
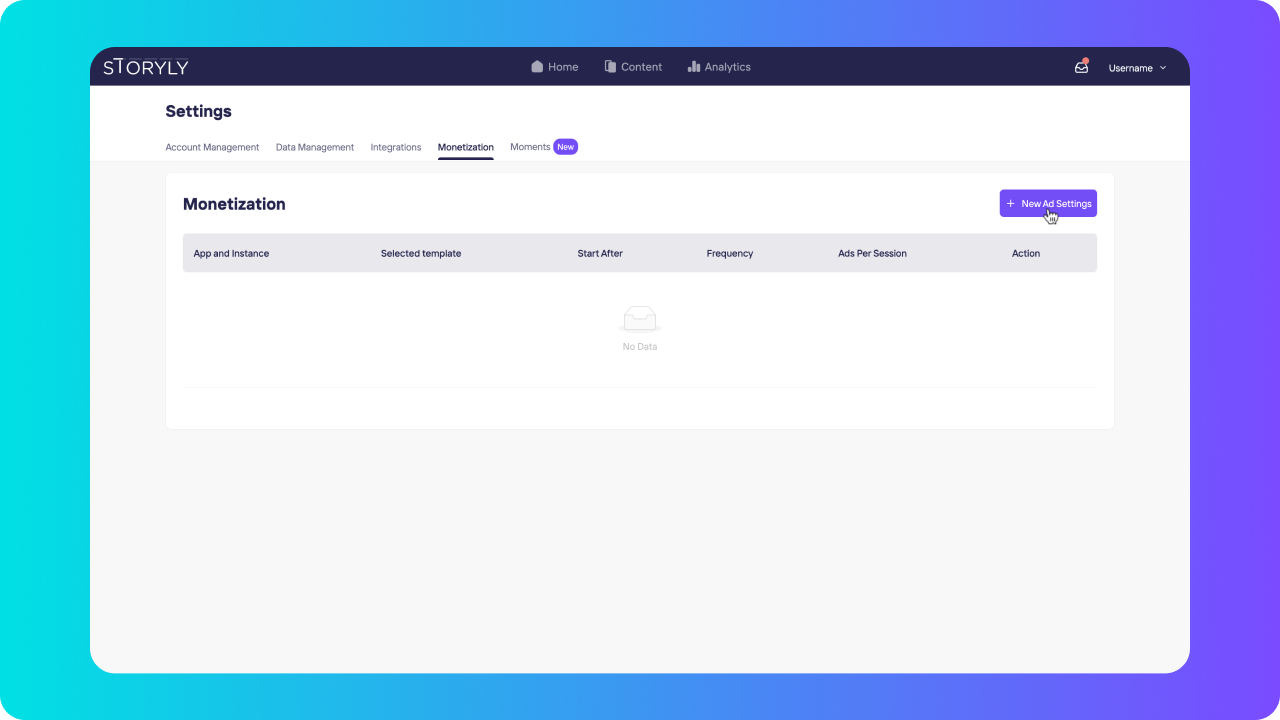
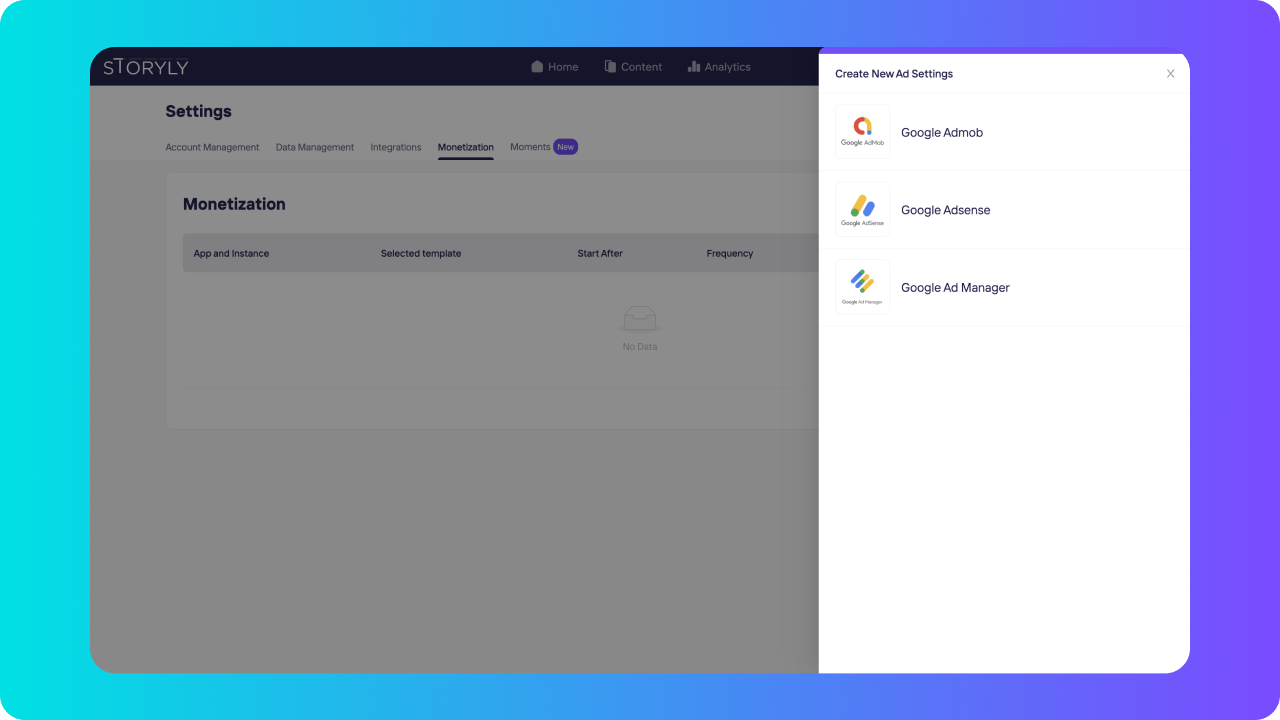
Under the Monetization section, click on + New Ad Settings to get started. Select Google Adsense or Google Ad Manager option.
Select your website where you want to show story ads. You can select specific Instance as well.
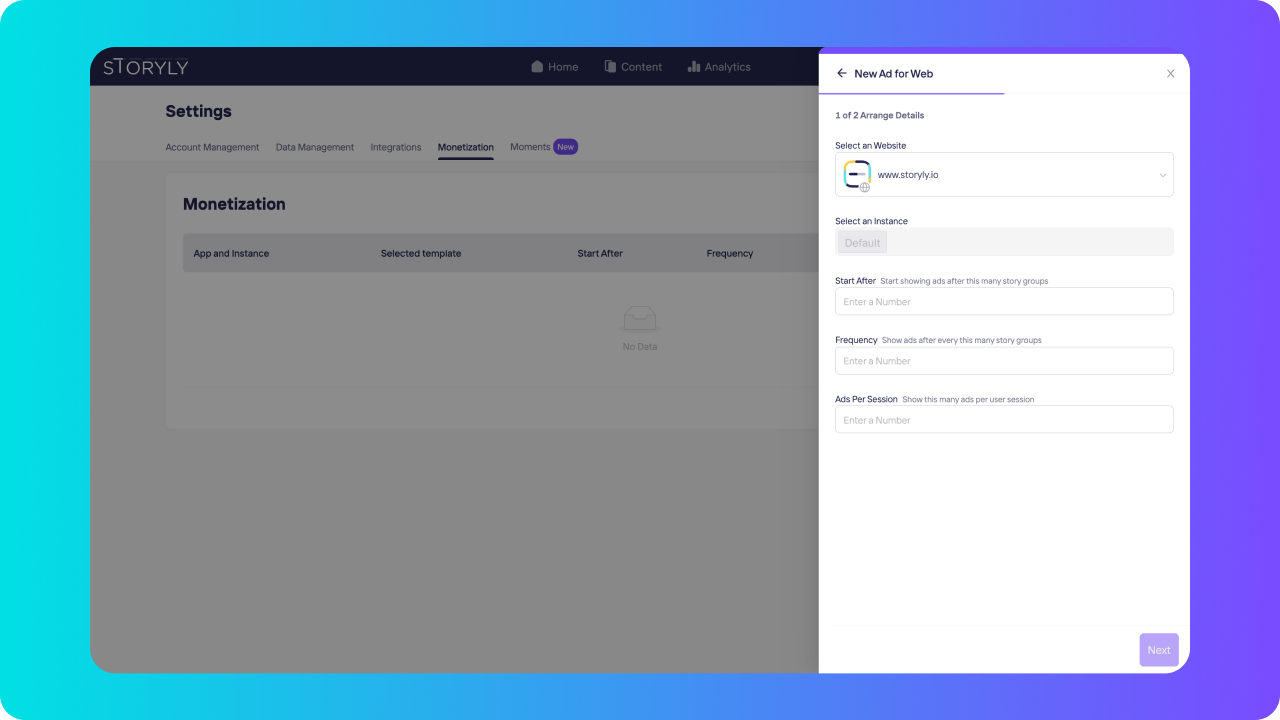
Now, the related ad settings.
- Start After is actually for you to decide when will the ads occur. For example, if you set it to "1", your first ad will show up after a user watches the first story group.
- Frequency is all self-explanatory, its about how frequently your ads will be shown to your users. Let's say, "2", this means after a user watches 2 story groups, there will be an ad.
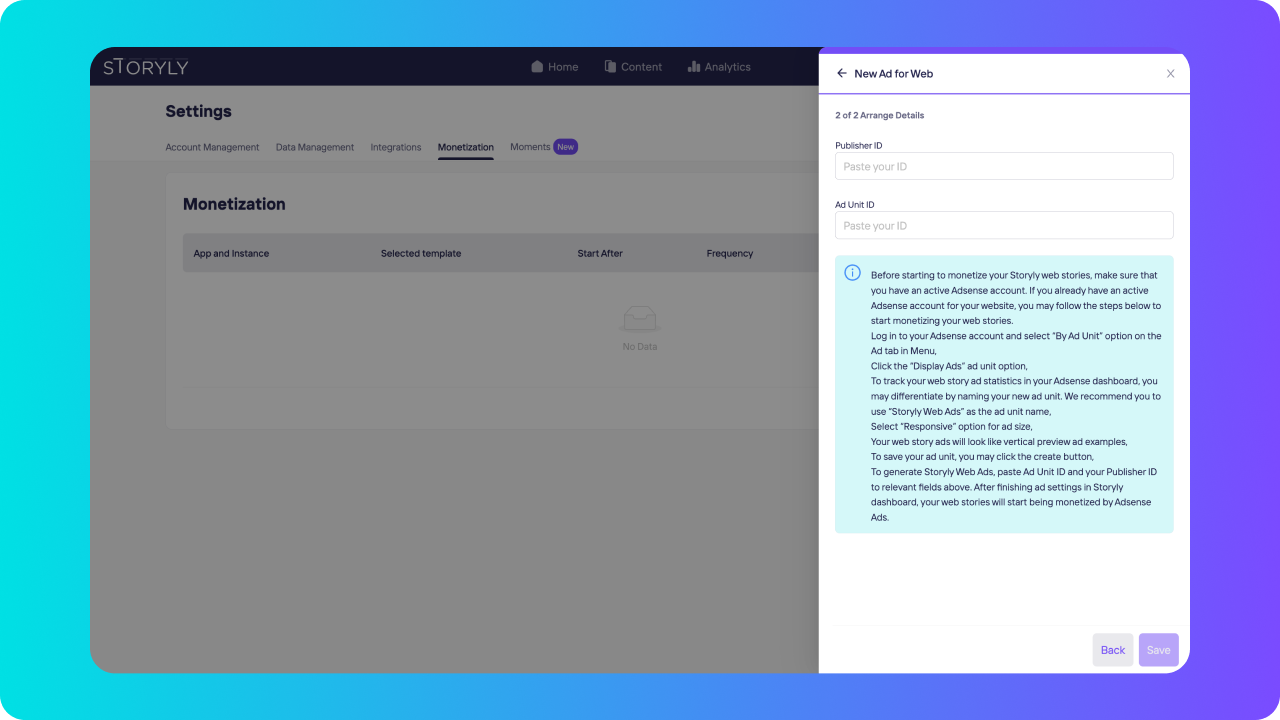
Finally, to generate Storyly Web Ads, paste Ad Unit ID and your Publisher ID to relevant fields.
You are all set, your web stories will start being monetized by Adsense Ads.
Monetization for Web Stories with Ad Manager
You can use Ad Manager to create ad units and run stories between story groups by using that unit.
But first there are several steps you have to complete on Ad Manager side.
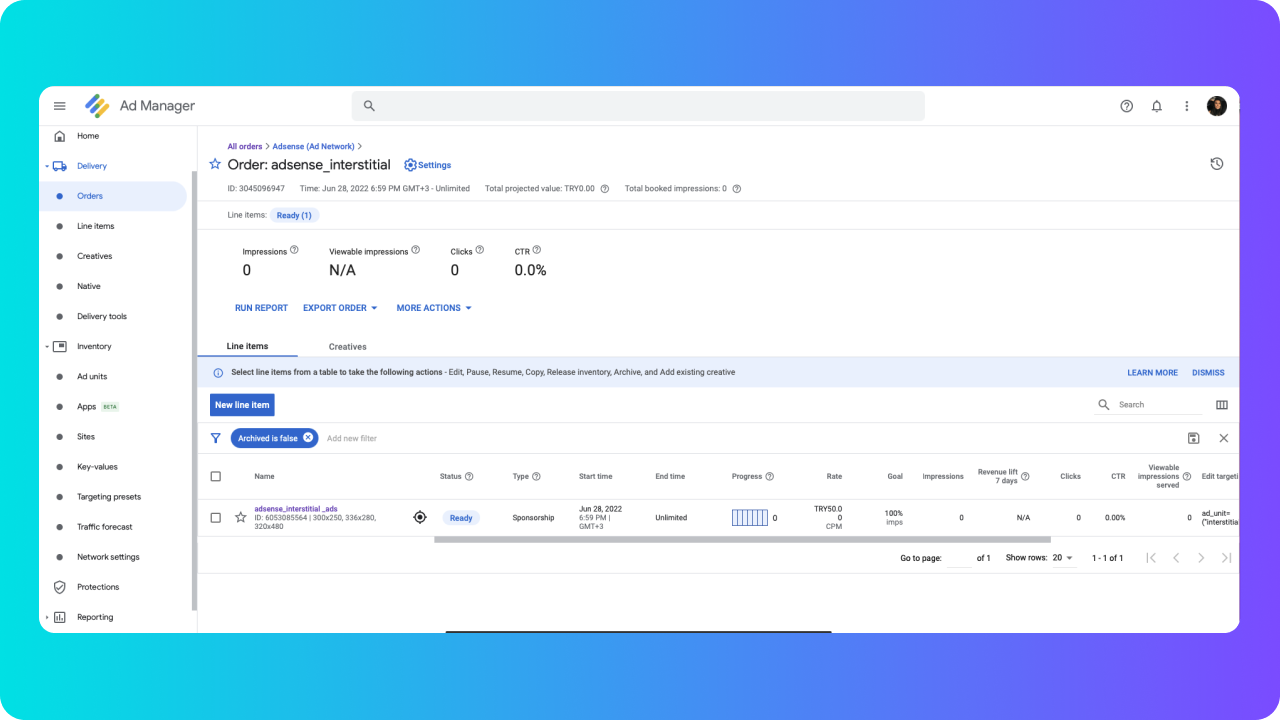
First, start by creating an Ad unit from the Inventory section on the left.
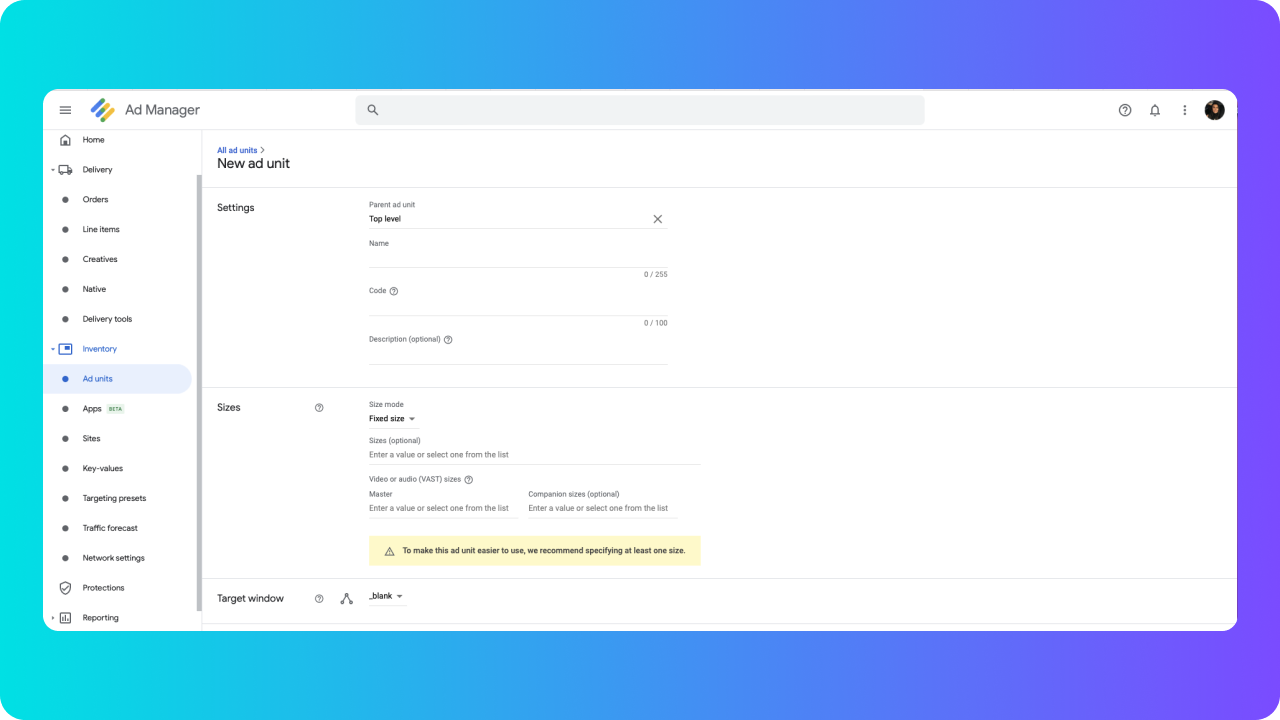
After clicking on New Ad Unit, you have to fill the Name and Code sections. Google suggests that filling those two sections with the same name, as it helps on reporting processes.
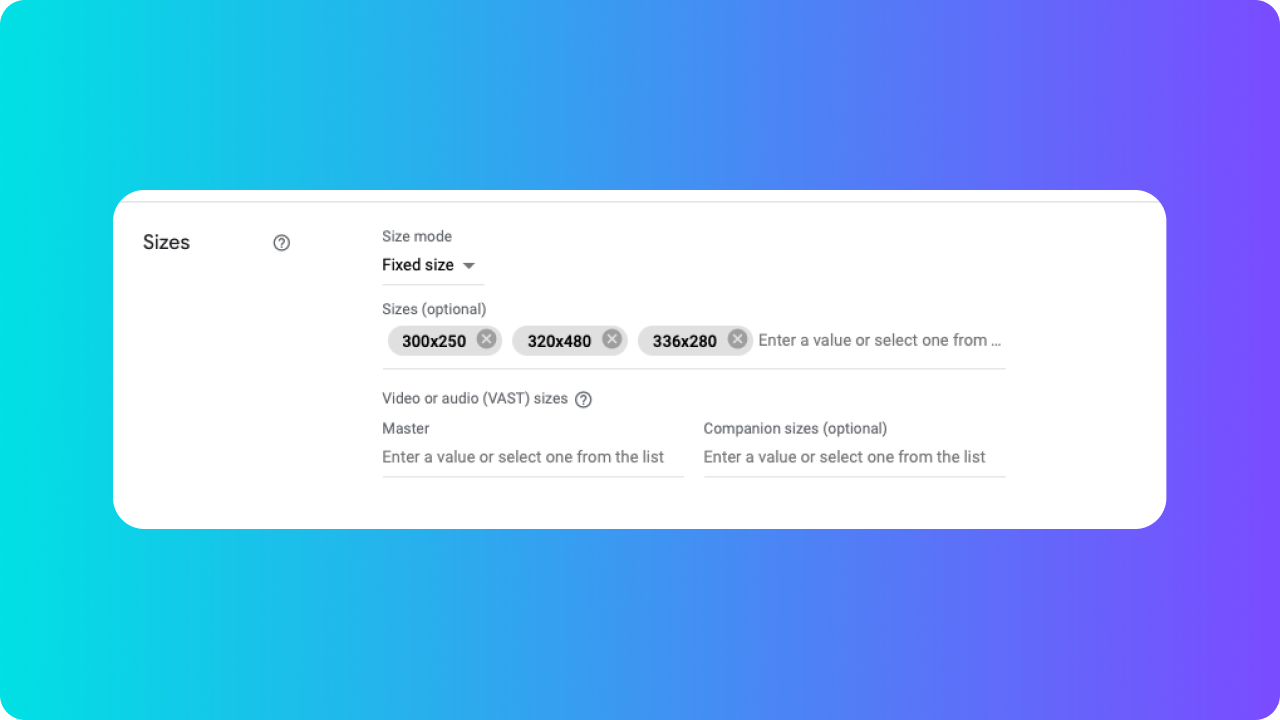
Next, select the Fixed size and chooses your sizes. You can choose the ones above, those are the ones for mobile, desktop and tablet screen sizes. Once you've selected the sizes, click Save and your Ad unit is ready.
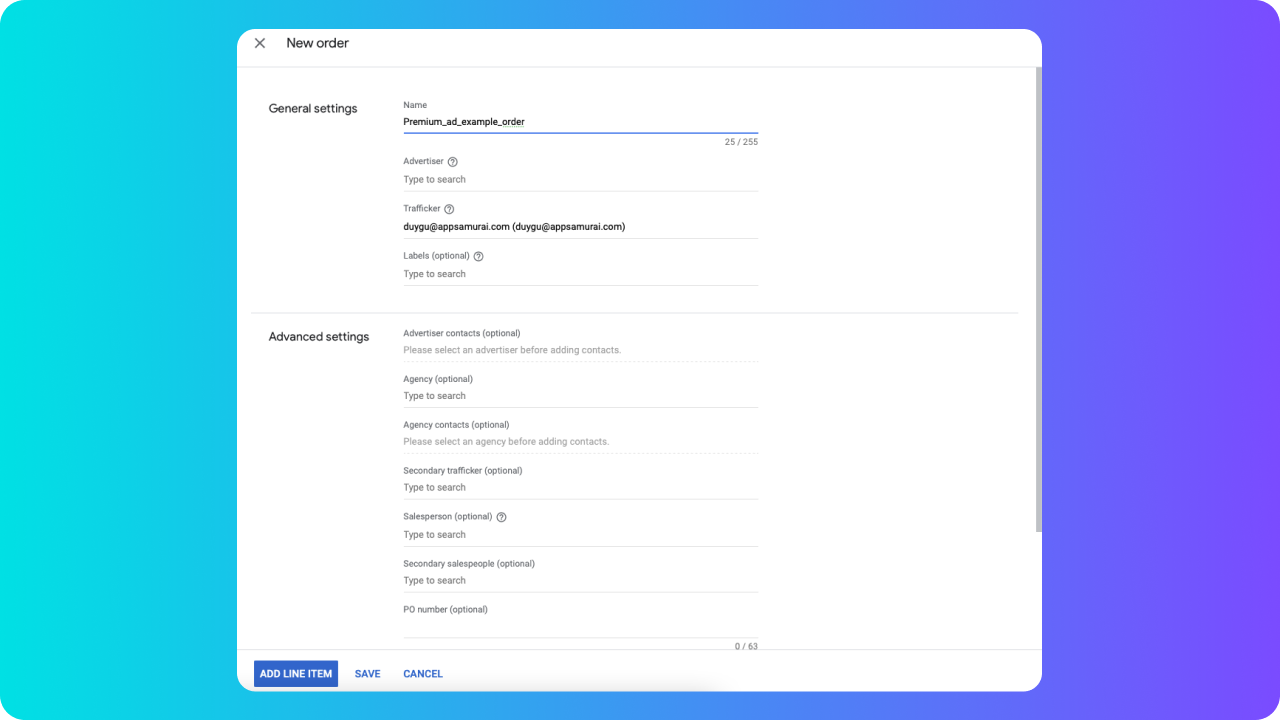
Now, you have to identify the advertiser for your Ad unit. Under the Delivery section, choose your Ad unit and click on New order to start identifying your advertiser.
Give your order a name first, after you can also select Add a new company under the Advertiser section to use your direct deals as Ads.
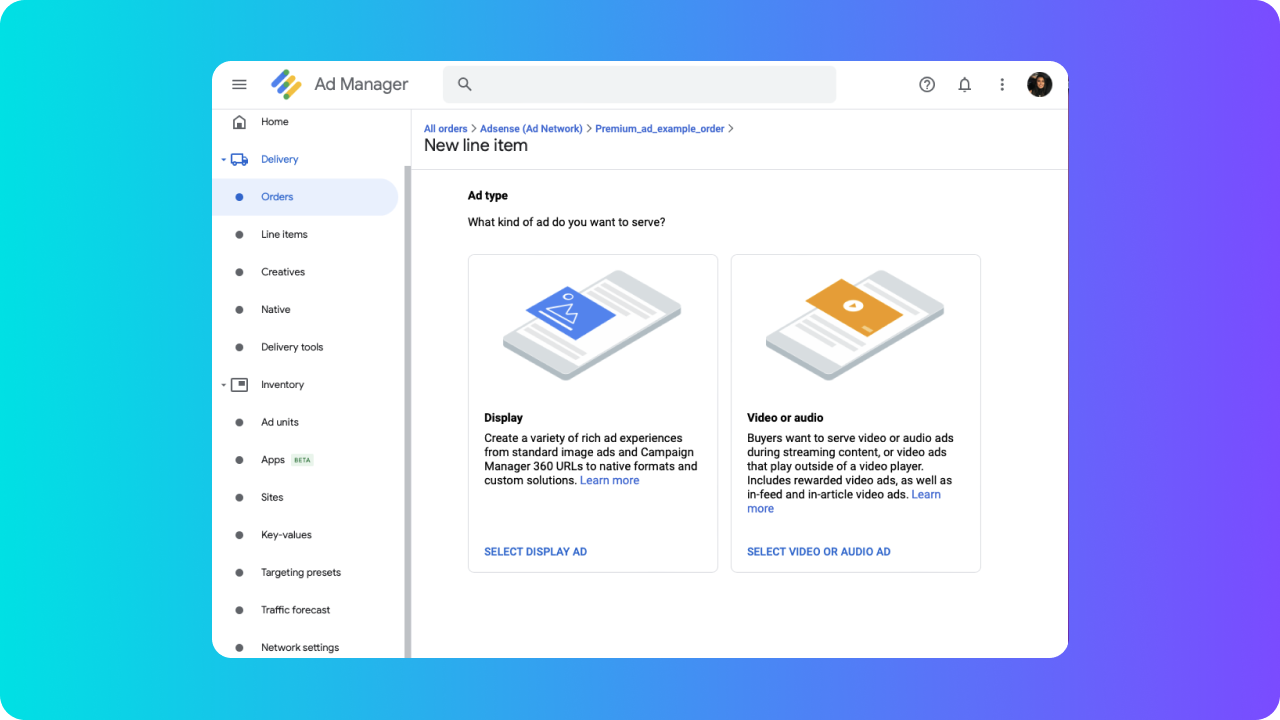
Once you've completed the required specifications, click on Add new item to start creating your ad type. For Storyly web stories, select the Display and continue.
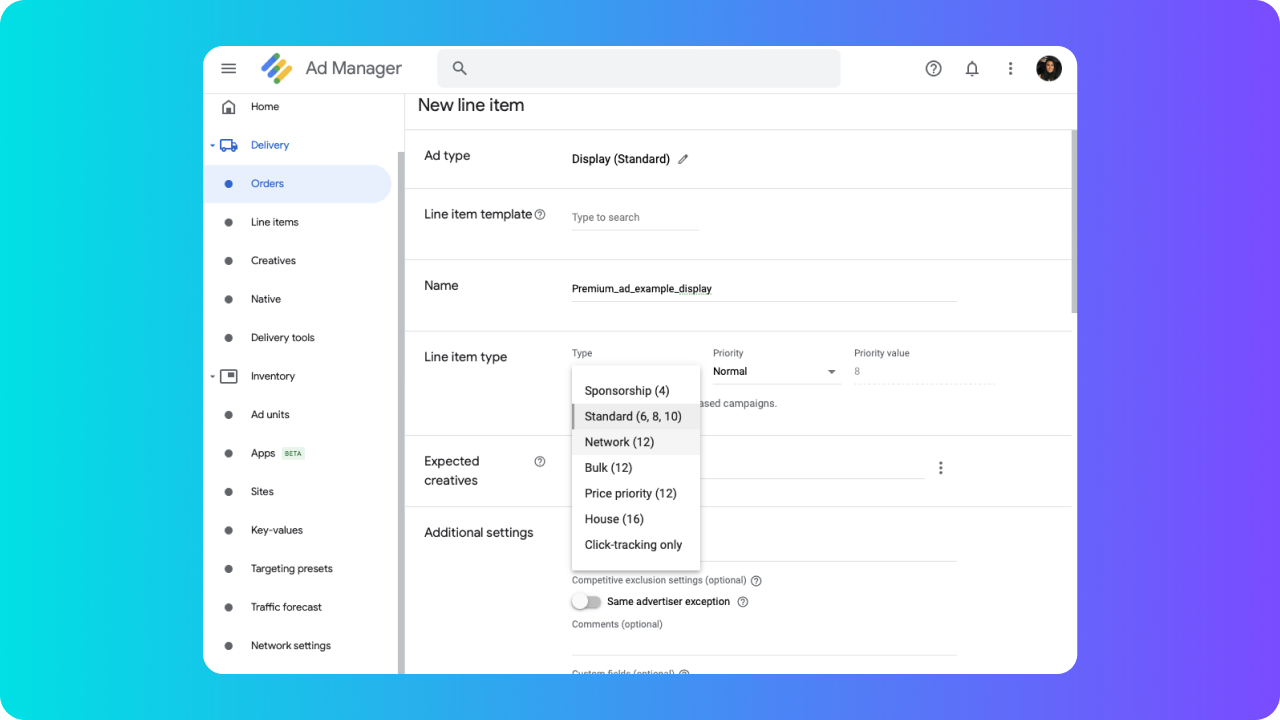
Time to identify the New line item. There are few steps to complete here.
- Give a name to your new line item,
- Line item type part is for the ordering of your ads. You are basically selecting the priority and the hierarchy of your ad unit.
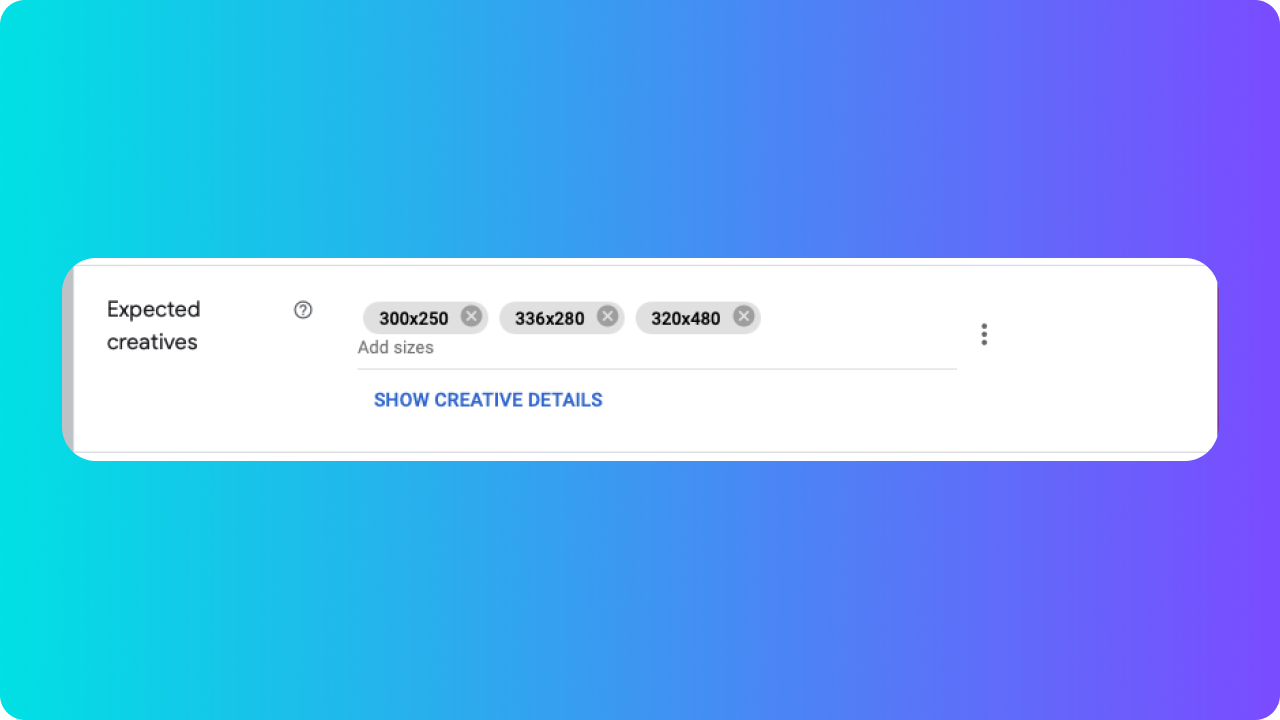
- Expected creatives has to be the same sizes which you've chosen before while creating the Ad unit.
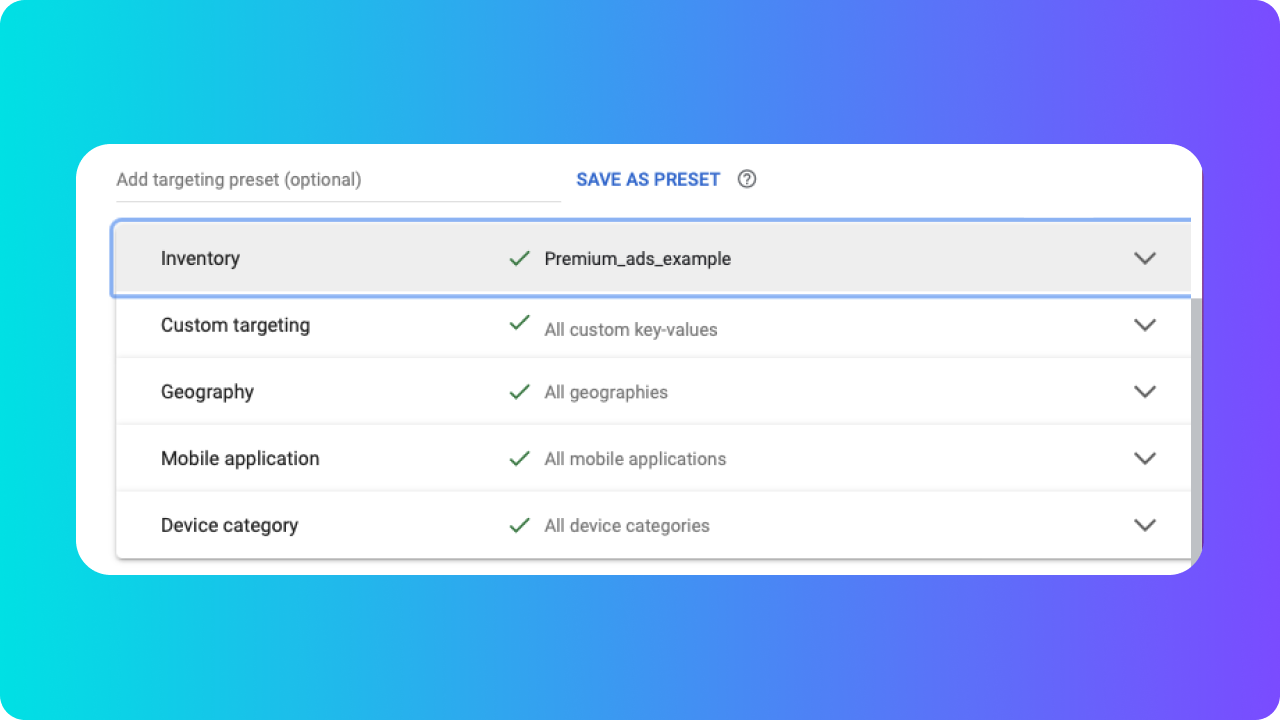
- Under the Inventory section, select the Ad unit you've created, so, your inventory and Ad unit will be matched.
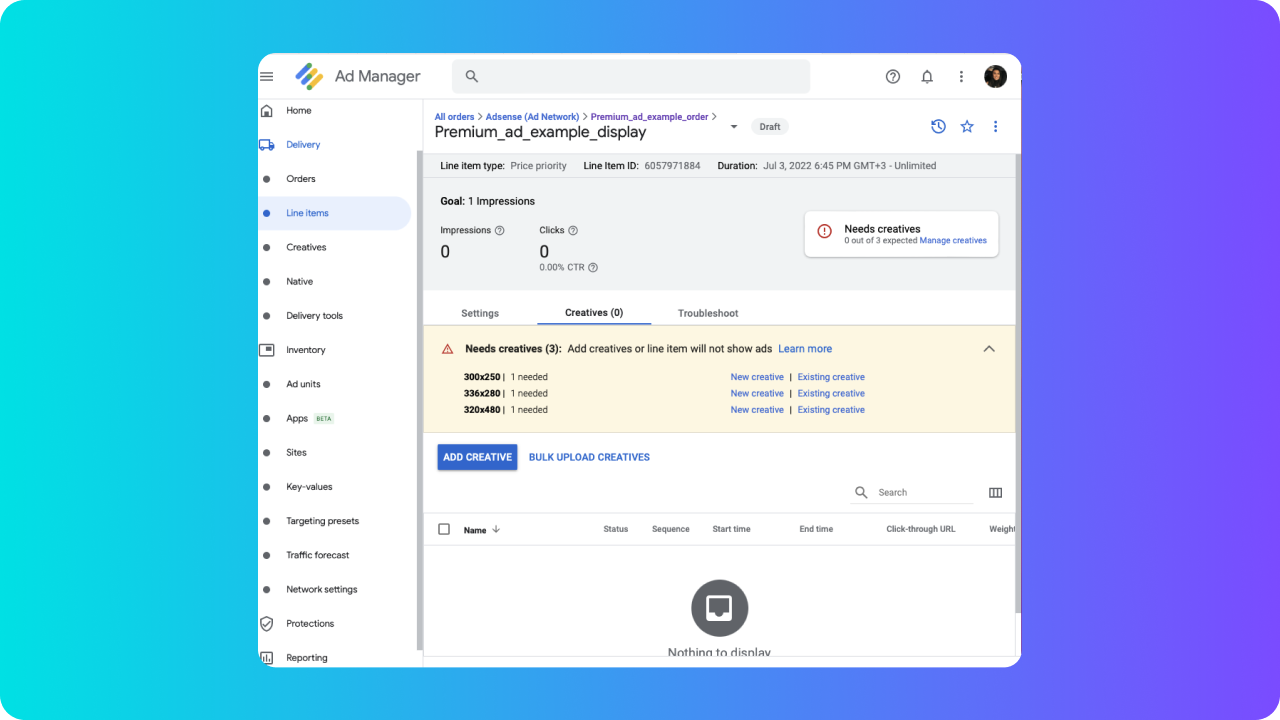
You have to select a creative for each size you've provided on the Ad unit.
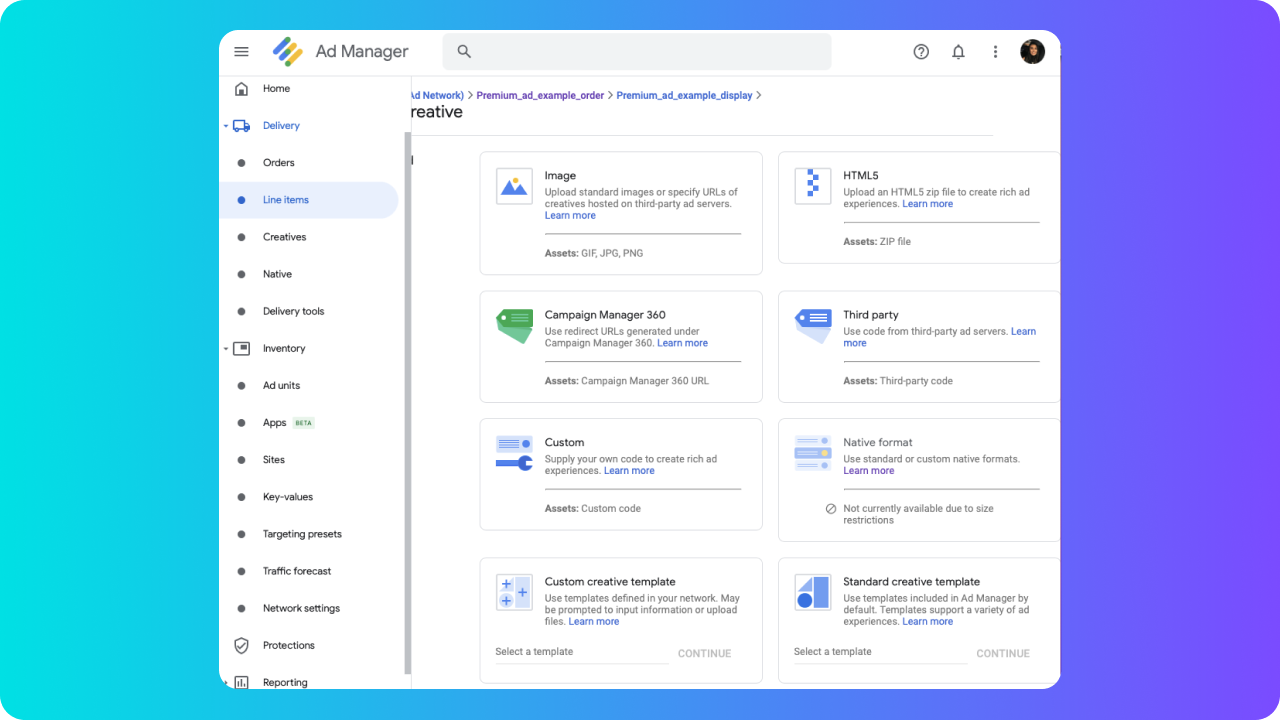
You can click on New creative, select your creatives and click on Approve to finalize and start getting ads.
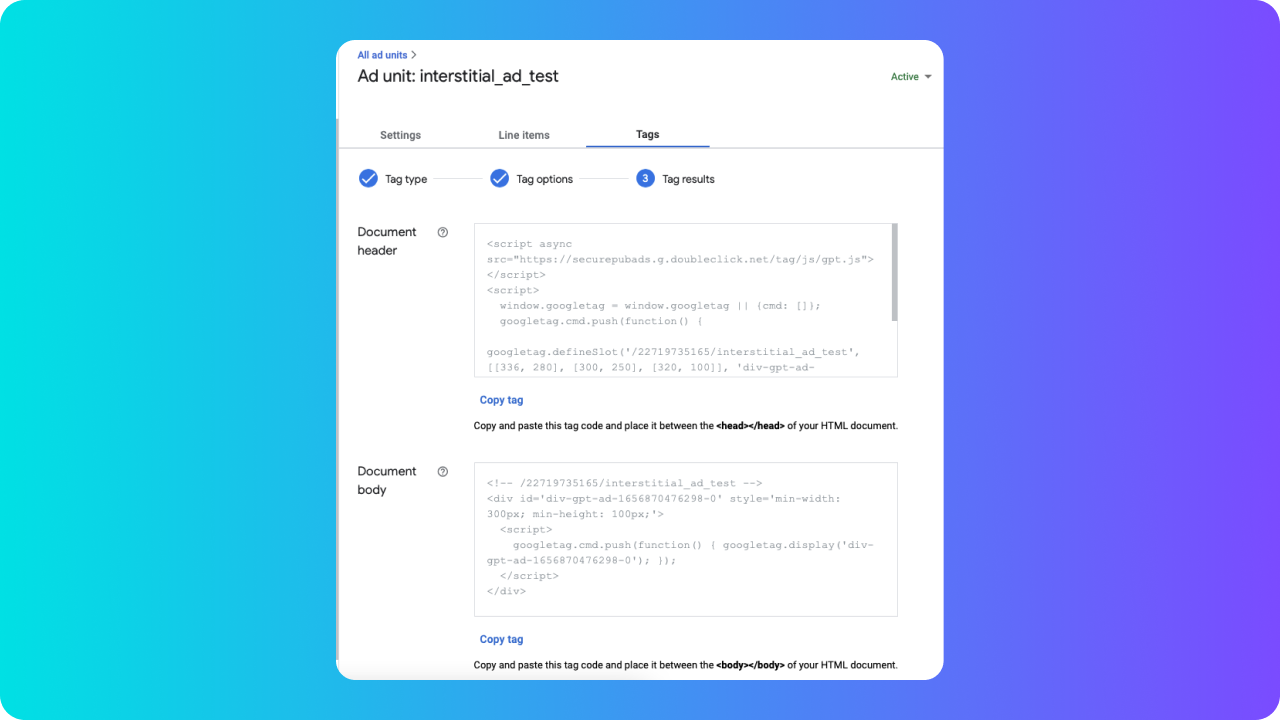
To get your Google Tag Manager codes, select your new Ad unit, navigate to Tags from above. Select Publisher Tag from Tag type.
You'll be needing these tags on Storyly dashboard.
Time to create your web stories ad on dashboard now.
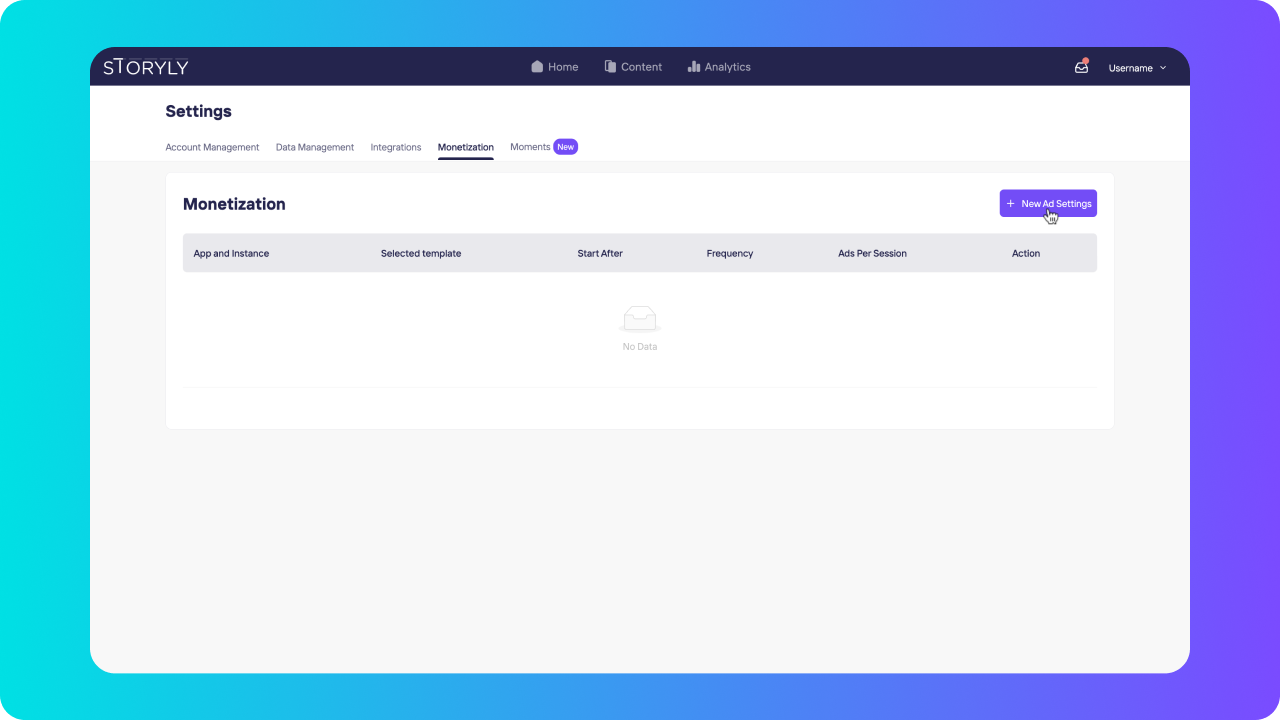
Go to Monetization under Settings on Storyly dashboard and click on + New Ad Settings.
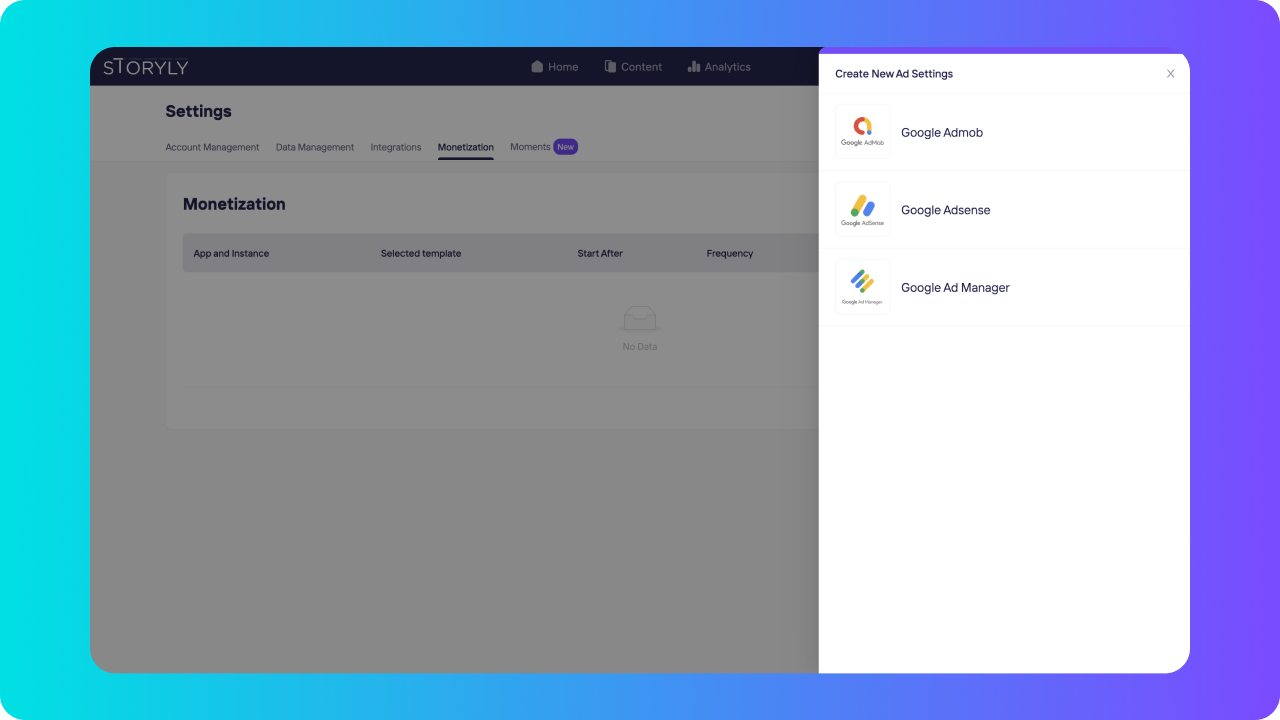
Select Google Ad Manager.
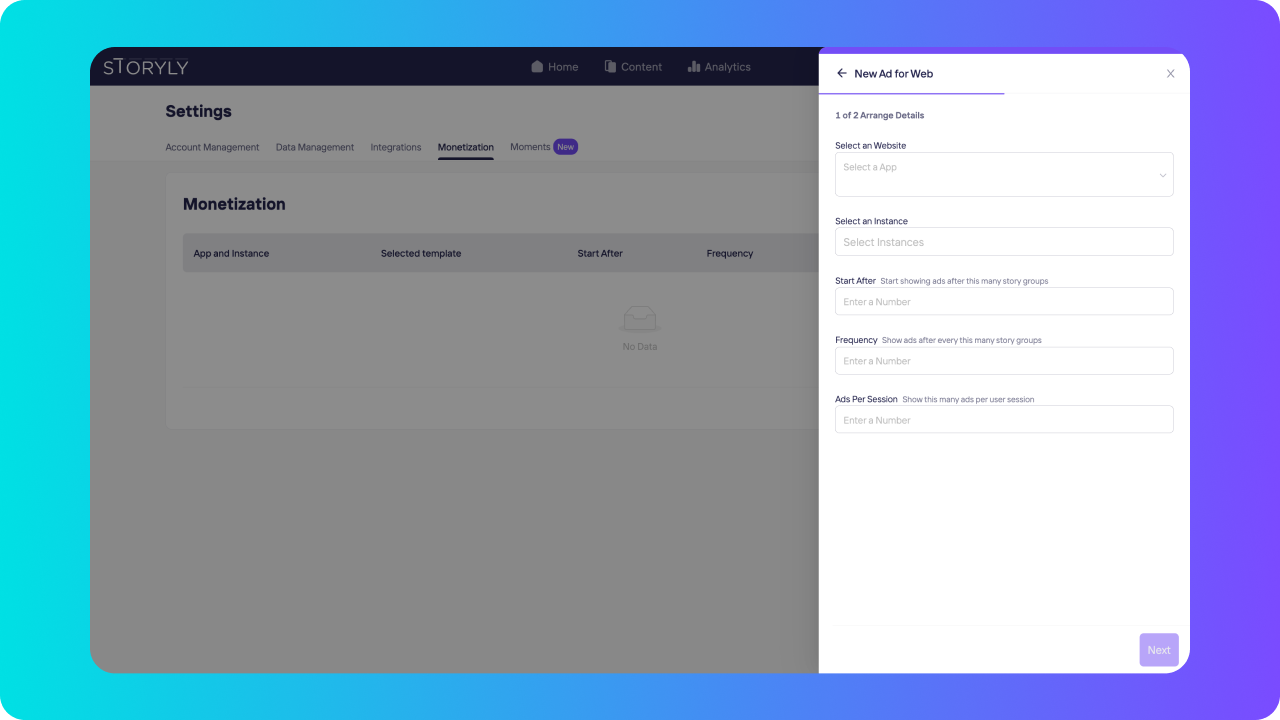
Select your website where you want to show story ads. You can select specific Instance as well.
Now, the related ad settings.
- Start After is actually for you to decide when will the ads occur. For example, if you set it to "1", your first ad will show up after a user watches the first story group.
- Frequency is all self-explanatory, its about how frequently your ads will be shown to your users. Let's say, "2", this means after a user watches 2 story groups, there will be an ad.
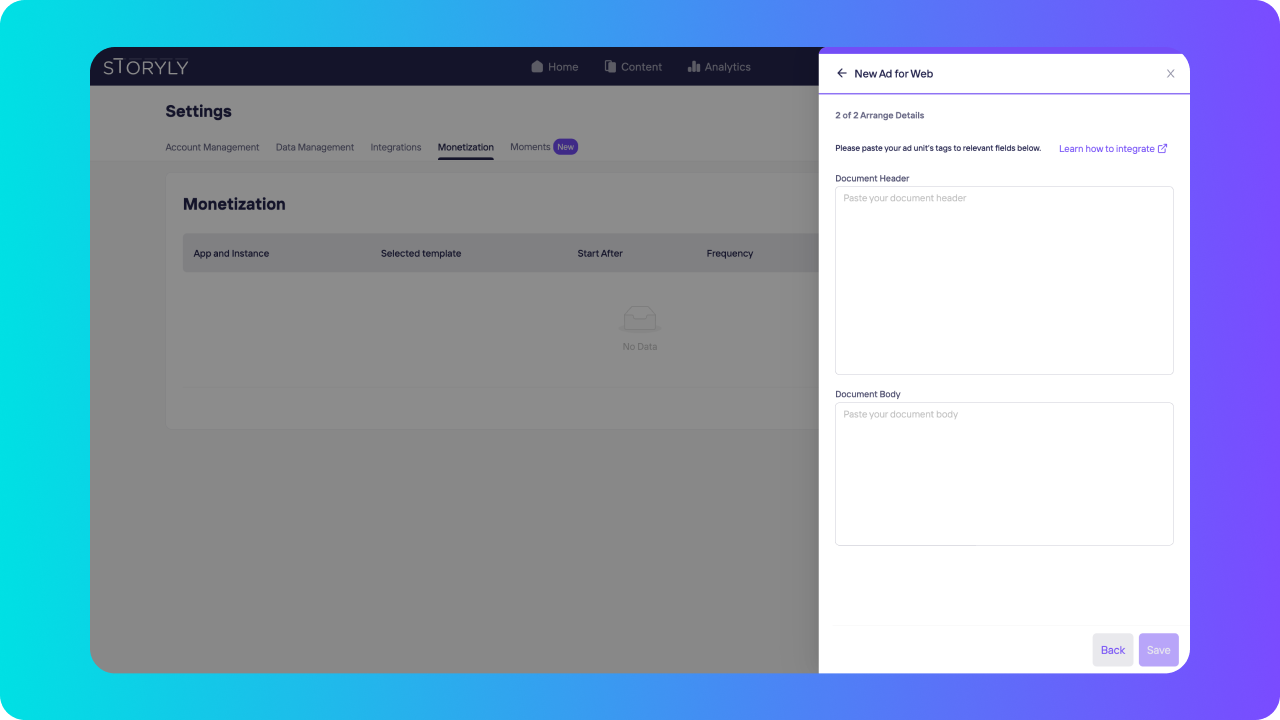
Final step, get the Tags of your new Ad unit that we've created at the beginning and paste them to the relevant section and once you are done, hit the Save button!
You are all set, your web stories will start being monetized by Ad Manager Ads.
